cubes
I'm going to make a Rubik's cube. I'll be using modifiers and mapping.

I'm going to start with the simple cube. Also, I'm going to save the project and name it Rubik's cube.


I'll click on the wrench, which will take me to the add modifier button.

Click on the add modifiers and then click on the bevel selection.

So, the cube will look like this. I want to change the bevel a little to make it rounder.

I changed the segment to 5 and clicked on the button smooth in tools.

Next, go to edit mode and select the face.

Press I to inset the face. Do the same thing on all of the faces on the cube. You can either continue or move down a couple of steps to add array. Don't forget to save.

Select a face and press E to extrude into the cube. Do the same thing to all the faces on the cube.

Now extrude the face out of the box. Do the same thing to the rest of the faces on the cube.


Change the count to 3 and check the box constant off. Change the X: -6.05000 and Y:2.00000. Make sure the boxes aline with each other.

I did forget to hit apply right above the one I have marked. So apply that one first and then apply the one I have marked right after that.

It should look like this. Then go to add modifier again and click array.

It should look like this.

Change the count number to 3 and then check constant off. Change X: -6.05000 and Z:2.00000. Make sure the boxes aline with each other.

Click Apply button and you are we are very close to completing the Rubiks cube.


Select the box button on the right. Change everything I marked in red. On the left everything to 0 on the right to 1.000. Don't forget to save.


We have the material window open and we are going to select the box in the diffuse section.

So I made my cube a darker shade of gray. I did R, G, and B at 0.050. You can also pick a different shade that you prefer.

#Now I'm going to add six new colors to my Rubik's cube. I select a + box to create a new material slot.

Once you created the new material slot go down to add new material.

You would come up with the same window to choose the new color.

So I made a red color for one side of the Rubik's cube. I also named my material selectors by double-clicking on each name that I wanted to change.

So have my colors picked out and named by repeating my step from the # point above.

Now we are going to go from object mode to edit mode.

Now select all the faces on one side of the Rubik's cube and then select one color. After that press the Assign button. Do the same thing on all the other sides with the other colors.

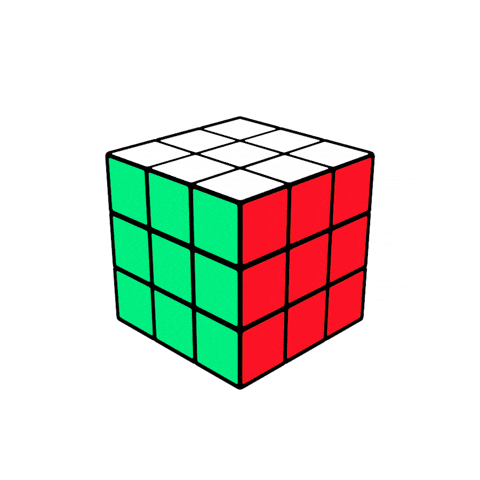
Go to object mode and here is the Rubik's cube.

This is a rendered finished Rubiks cube.


Comments
Post a Comment